The Beginner’s Guide to Starting A Blog in India
You’re just 25 minutes away from starting a profitable blog.

With the reach of the Internet, people’s interest in Blogging is also increased. It is a fact that if you have a blog around your business or products, you can get huge exposure and earn money.
For some people, it is quite easy to blog, while some face difficulty in starting a blog for their business.
Newbies are often confused about where to start! What is the first step to creating a blog?
If you’re not familiar with it and need some guidance on how to start a blog in India, this definitive guide will help you create a blog step-by-step.
In this in-depth guide on how to start blogging in India, I’ll brief you on every basic step needed to start your own blog.
If you’re standing at the starting line of your blog journey, don’t worry. There’s a lot of information out there to help you get started.
So in this blog, we’re going to take you through launching a blog from the ground up.
So, are you ready to blog your way to success? Let’s go!
How to Start a Blog in India that Makes Money? The Ultimate Guide for Beginners!
Before starting a blog, let’s get an idea about blogging.
In simple terms, Blogging means writing fresh content around something. You may write this content around your business, or just for sharing information or your experience. The content could be anything.
In Blogging, the Blog is just like your diary in which you write information or articles. Similarly, in a blog, you write articles related to your business, but it is an online diary.
Read This: What is Blogging? How to Become A Blogger?
But do you know you can earn money blogging?
Yes!
Monetization is a by-product of blogging. You can earn passive money online with the help of blogging. Many bloggers in India are generating passive money like this.
Do you know anyone who can make money blogging? Yes, there is no such barrier as age, gender, or geography.
What can be better than this? Just share knowledge about the topic you love and earn money.
But it is not as easy as I’m saying!
You should find a topic in which you can write and explore indefinitely and it must be monetizable too.
Let’s discuss it later in this guide. Now, move on to our principal topic about how to start a blog.
How to Start a Blog in 2023 From Scratch? Step-By-Step Guide to Beginners!
So far, you have got an idea of Blogging, now it’s time to learn how to become a blogger in India. Here are a few easy steps to start with:
- #1. Pick Your Blog’s Niche
- #2. Choose a Blogging Platform
- #3. Choose a Domain Name for Your Blog
- #4. Choose a Reliable Web Hosting
- #5. Get Started With Your Blog
- #6. Customize Your Blog
- #7. Connect Your Blog to Google Search Console
- #8. Publish Content and Promote
How to Start a Blog in India for Free?
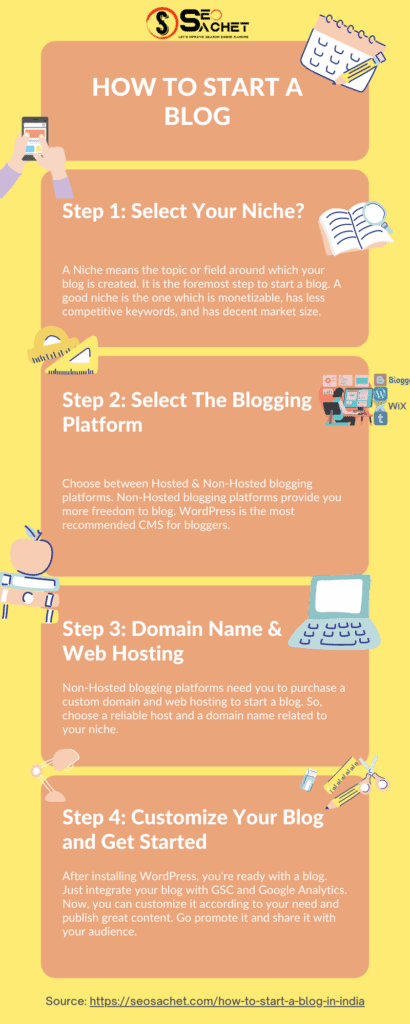
So, these are the 8 most important steps to creating a blog. Let’s explore each step to making a profitable blog.
Step #1.
Choose a Perfect Niche
Niche plays a vital role in your blog’s success. So, how to choose the right niche for your blog?
Read the tips shared below.

#1. Pick Your Blog’s Niche
This is the foremost thing to consider while thinking about starting a blog.
Yes! Your blog’s niche plays an important role in your blogging journey.
What actually a “Niche” is?
A Niche means the topic or field around which you created your blog. It can be entertainment, health, yoga, travel, food, tech, blogging, amazon products, games, etc.
If you want to start a profitable blog and make money through it, then it is a must to choose the Niche that is monetizable.
A monetizable niche is which can generate money for you. For example, games, tech, health, etc. are some popular blog niches that can help you generate passive income online.
How can you select a topic for your blog?
Well, this is the most important part of starting a blog. You may get an idea of a topic on your own, but you can’t identify whether a particular niche is monetizable or not.
In such a case, you need a keyword research tool to find the search volume and all related sub-topics to that topic. Semrush is an SEO tool that is perfect for such keyword research.
For example, if you want to start a YOGA blog, you may use the Semrush Topic Research tool to explore your interested field.
Simply put your major topic in the topic generation tool and get many ideas.
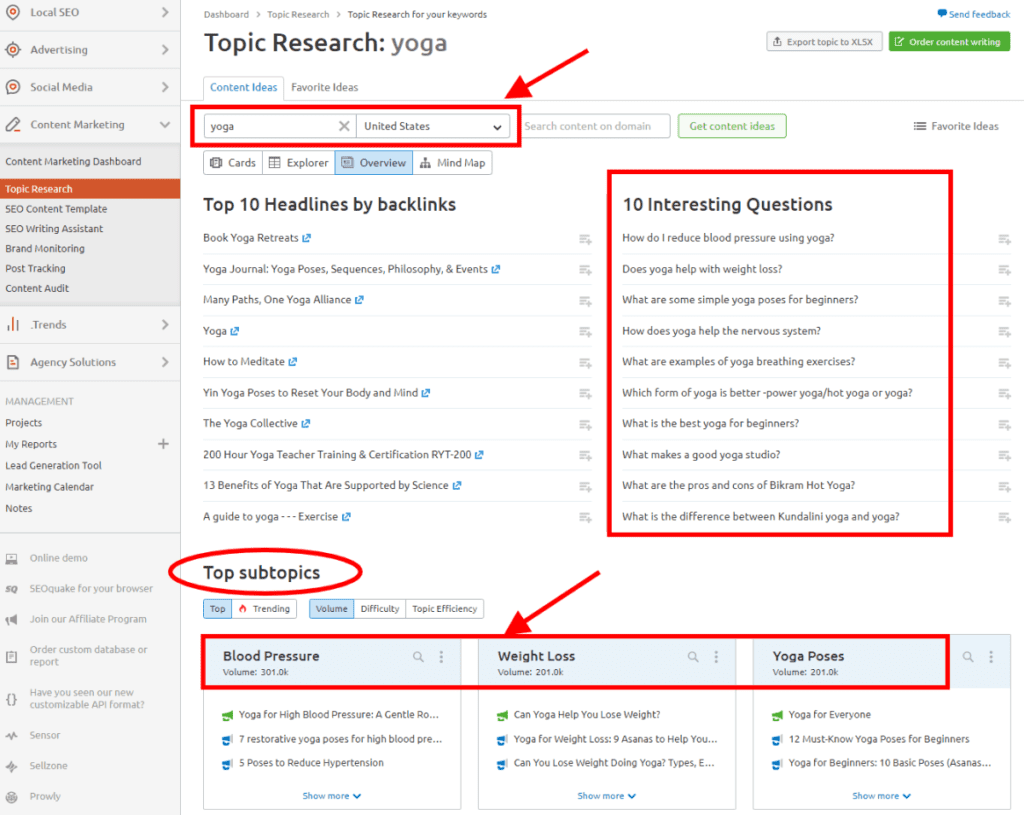
Here you can see that the Yoga niche has many sub-topics on which you can write many articles and it is a monetizable niche, too. So, such a type of Niche research is crucial when starting a blog in India or any other country.
Step #2.
Choose the Blogging Platform

#2. Select the Blogging Platform
The blogging platform is another important term that you need to understand. There are two types of blogging platforms:
- Hosted (free platform)
- Self-Hosted (paid hosting required)
Hosted Platform
Hosted platforms are blogging platforms that allow to you make a blog for free. It means no need to buy server and domain name.
The most commonly hosted platforms are Blogger.com and WordPress.com.
Though these platforms allow you to create a blog for free, there are limitations too.
What does it mean?
Let me explain it to you!
With the hosted blogging platforms, you can start a blog for free, but the domain name of your blog contains the sub-domain name linked to that blogging platform.
For example, on Blogger.com your free blog name will look like yourdomain.blogspot.com while on WordPress.com it will look like yourdomain.wordpress.com
It is not a favorable domain name for any professional blogger or marketer. Everybody will avoid getting such a domain name.
The reason is that such a domain name will not build trust among the audience, as it would look like an amateur blog. On the contrary, a custom domain name will help you in building the reputation or brand of your business.
So, I’d strongly recommend you use a custom domain always.
Choosing the right web host is an important step when starting a blog in India. WordPress, Tumblr, and Blogger are free blogging platforms but they come with limitations and you can’t fully monetize your blog. It’s recommended to find a reliable and affordable web host that suits your needs. This will ensure that your blog runs smoothly and has the necessary features to grow your audience and monetize your content effectively.
This type of hosted platform is best for you if you’re blogging for fun or just sharing your thoughts. But, if you’re taking blogging as a career, a Non-Hosted blogging platform is best for you.
Many new bloggers use hosted platforms to start blogging in India.
Non-Hosted Platform
A non-Hosted blogging platform is not hosted by any companies like Blogger.com or WordPress.com
On the contrary, it is self-hosted. What does it mean?
It means that you have to host your blog yourselves using paid hosting. If we explore it further, purchase a server for your blog to host the data, and along with this; Purchase a domain name for your blog.
In a Non-Hosted platform, you can choose a CMS of your choice.
What do you mean by CMS?
CMS is a Content Management System that you can install using your hosting provider to run your blog.
It is software that you install to create and manage your blog/website. It provides you with a user-friendly interface rather than coding to manage your blog.
The most common examples of popular CMS are WordPress, Joomla, Drupal, Wix, etc.
I’d recommend using WordPress as it is a widely used CMS to start a blog or website.
Step #3.
Domain Name
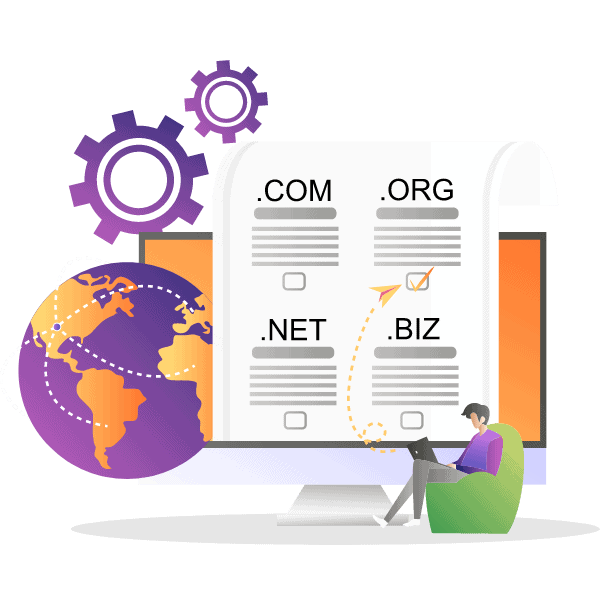
There are many domain extensions like “.com, .org, .net, .biz, .in, etc.” Choose what suits your needs.
#3. Choose a Domain Name for your Blog
A domain name is basically your blog’s identity. It is the name to which we know your blog.
In my case, the domain name of my blog is “SEOSachet.com“
You guys remember this blog with this name. There are a few things that you need to keep in mind while choosing a domain name for your blog-
- It should be related to your blog niche
- It should be short (a large one is not preferable as the audience will remember a short name easily)
You may use GoDaddy or NameCheap to purchase a domain name for your blog.
Step #4.
Select Web Hosting
You need the best web hosting service for data storage and handling traffic spikes.
There are many popular web hosting service providers, like Bluehost, Kinsta, WPX Hosting, and Rocket.net. etc.

#4. Choose a Web Hosting for your Blog
As you have purchased a domain name for your blog, now you are ready to host your blog.
You just need perfect website host for data storage and handling the web traffic. Choosing the right web hosting service ensures that your blog runs smoothly and remains accessible to your readers.
There are many web hosting providers in the market, like Bluehost, A2 Hosting, GreenGeeks, CloudWays, WPX Hosting, etc.
Since you are just starting your blog, I’d recommend you use Bluehost as WordPress officially recommended it.
Bluehost Black Friday 2023 Deal: Get an exclusive 73% OFF!
We may note that some web hosting providers offer you a free domain for a year. You may choose their offer or let it go if you’ve already purchased a custom domain for your blog.
If you’ve got a limited budget and starting your first blog, then you may consider this offer. However, if you have a long-term goal, then I’d recommend you purchase the domain name from GoDaddy or NameCheap.
The reason for neglecting the offer is whenever in the future you want to change your blog hosting; you need to provide some extra charge for your domain. However, if you choose an independent domain name provider, you’re free to change the web hosting as many times.
You may use this guide on how to start a blog using Bluehost, else follow these steps to get started.
How to Get a Bluehost hosting account?
- First, select a domain relevant to your niche.
- Then click here to get started with Bluehost. Once you land on the official website, click on the Get Started button.
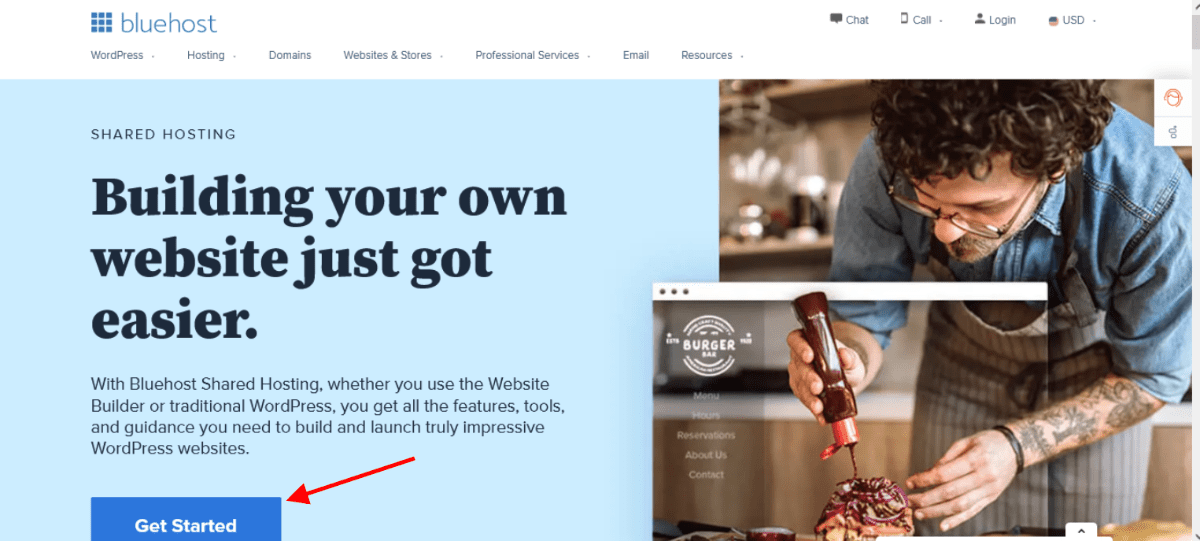
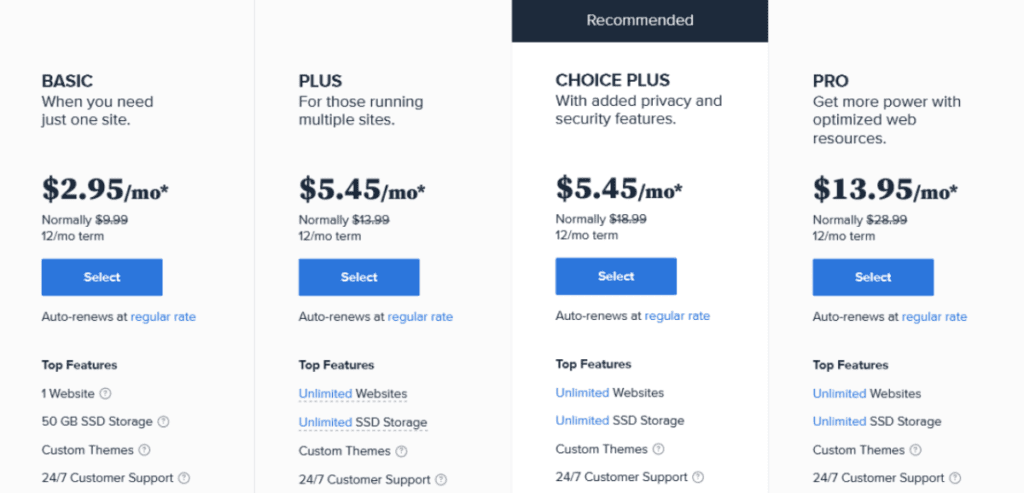
- Now, you’ll see four types of plans, select the one as per your need. Since you’re starting your blog, you may choose the BASIC hosting plan. If budget is not an issue for you, the PLUS plan is perfect for you.
- On the next page, provide your custom domain name.
- Here, you can register your new domain name or you can use the already-owned domain name. Just enter your domain name here to continue.
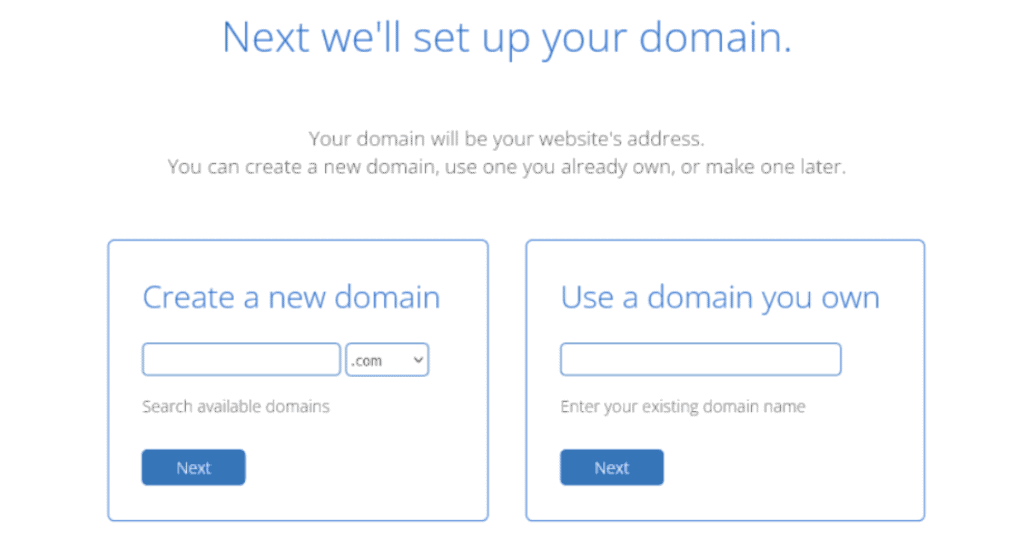
- If you register a new domain name here, then nothing to do. But, if you have got a different domain name provider, then you’ve to point the nameservers to the Bluehost nameservers.
Changing the Nameservers is just to connect the domain name and web hosting account. If you register the free domain name here, then it is automatically pointed to the Bluehost. If not, then you’ve to change the nameservers by logging into your GoDaddy or other domain name provider’s account.
- Now finish your sign-up by providing the required details.
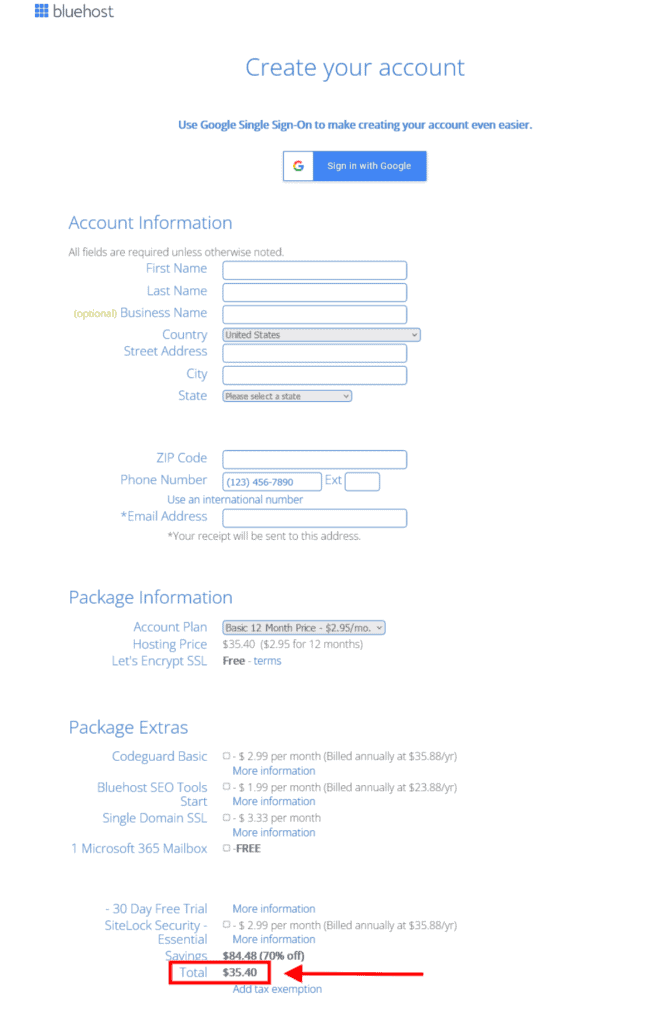
- Congrats! Now you have set up your hosting account.
Step #5.
Start Your Blog
It’s time for giving a start to your blog. Your blog is ready to gather speed with a CMS.
Go through the steps mentioned below to install WordPress on your blog.

#5. Get Started With Your Blog
As you have got the domain name and hosting, now it’s time to start your blog.
Wait!
Something is missing!
Yes, it’s CMS (WordPress). Without WordPress, you can’t even think of starting blogging in India.
How to Start a WordPress Blog?
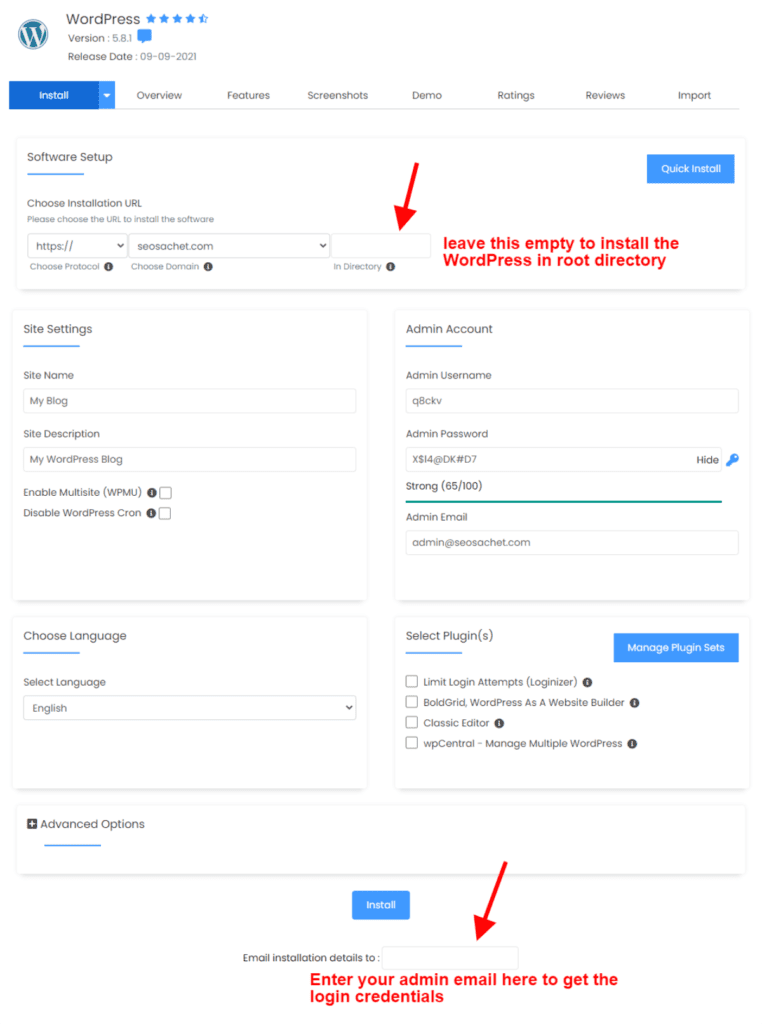
Now go to the cPanel area of your Bluehost account and see an option showing a SOFTACULOUS app installer. It contains WordPress which you need to install.
Just find WordPress in this app installer and click it.
On the next page, you’ll have to enter a few details to install WordPress on your blog. The below picture may help you in starting a WordPress blog.
Congratulations! You’ve set up a WordPress blog.
Now you can log in to the back end of your blog using the URL- www.yourdomain.com/wp-admin/ and enter your credentials.
👉 Just note down your WP username and password if you forget the credentials.
Step #6.
Blog Customization
Hurray! You’ve created your blog. Now, it’s time to give it a look.
Install the lightweight and fast-loading WordPress theme to attract an audience.

#6. Customize Your Blog
Now you have got a WordPress blog, but it needs some customization.
What type of customization I’m talking about?
Actually, I’m talking about your blog layout. You need to install the theme and plugins to give it a professional look.
Why am I saying that?
It is because the first impression is the last impression. If your blog layout is impressive, it will attract the audience and engage them. While it is just a simple blog, the audience will come on and then disappear forever.
How to change your WordPress theme?
The theme settings are available in the Appearance section. You just need to go to your WordPress Dashboard>Appearance>Themes

Here you will see many free themes available. You may start your blog using these themes. But to beat your competitors and engage your audience, you need a premium blog design.
Yes, a premium WordPress theme will help you in this because you can’t risk your hard work just for the sake of a blog layout. So, choose the blog design wisely.
Why should I choose a premium theme over the free theme available?
It is not mandatory to use a premium WordPress theme. You can customize your blog with free themes as well. But, I’d recommend you use a premium theme to make your blog more secure and robust.
Here are a few reasons to choose premium themes over free ones-
- You get full support and customization in premium themes, not in free ones
- You get premium updates that make your blog navigation and customization easier
- Premium themes are more secure and take care of your blog security
- You don’t need to mess up with coding to make your blog design lucrative. Premium themes make it easy to customize.
Earlier, it totally depends on you whether you want a premium theme or to run your blog with a free theme.
GeneratePress, Kadence, and Astra are some premium WordPress themes that I recommend.
So, now you’ve installed a premium theme, it’s time to customize your blog design using the premium theme.
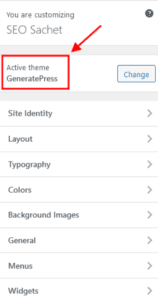
I’ve installed the GeneratePress premium theme on my blog, so, I’ll show you what are the areas that you can customize using it.
As you can see, the prime areas that you can customize are:
What are the essential plugins to install in your WordPress blog?
After installing your blog theme, the next thing you should consider is installing the important plugins.
Plugins are a crucial component of any blog. These give strength to your blog and make it sustainable. Also, you come to know about a few WordPress plugins that are really necessary.
I’ve compiled a list of the most important WordPress plugins that you should install on your blog-
Except for WP Rocket, all other plugins have free plans to use. Though they have paid plans too, you can upgrade to them later.
As I’ve said earlier, these are the most crucial WordPress plugins that you must have installed on your blog. So, I strongly recommend you use them.
Here’s something important that I don’t want to miss!
It is your blog’s permalink structure.
Yes, by default you get a permalink structure like- https://www.yourdomain.com/2021/11/sample-post/
But as you see, no one from your audience can remember such a complex URL, and neither it is SEO-friendly.
👉 Instead, I recommend you use this permalink structure to optimize your blog posts easily-
https://www.yourdomain.com/sample-post/
This type of URL is short and thus, easy to optimize, and user-friendly too.
How to change your blog’s permalink structure?
Go to WordPress Dashboard>Settings>Permalinks and change it from month and name to post name.

After this, you just need to know about a few more components of blogging like robots.txt file and XML sitemaps.
What is robots.txt in SEO?
Actually, Google sends its bots/crawlers to crawl web pages and ultimately gives them a ranking accordingly. So, robots.txt is a file that is needed to upload to your blog’s root directory and it prevents web crawlers from crawling the whole site and gives them a path to crawl.
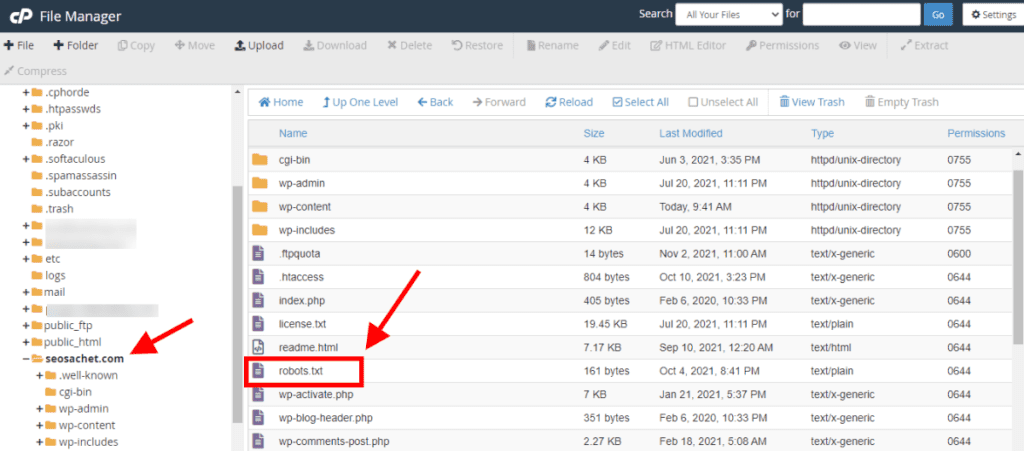
This is how you can find the robots.txt file and here you can see the live example of a robots.txt file that tells what you need to include in a robots.txt file.
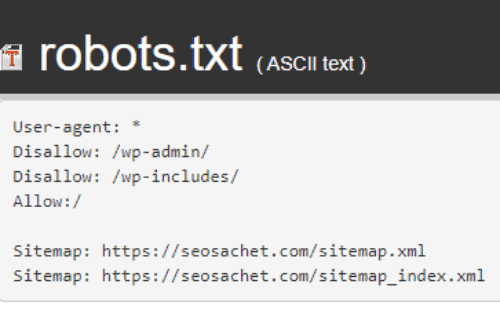
This is necessary to upload a robots.txt file because there is always a crawl budget set for a website. If every time crawlers access the whole site, you’re wasting your crawl budget. That’s why we need a robots.txt file.
What XML sitemap in SEO?
Sitemap, as the name suggests, defines a roadmap that leads to important pages of your website. So, whenever you update a blog post or publish a new post, it is necessary to update the XML sitemap. So that, Google gets to know that there is something new on a particular website/blog that it should crawl.
How to update the XML sitemap?
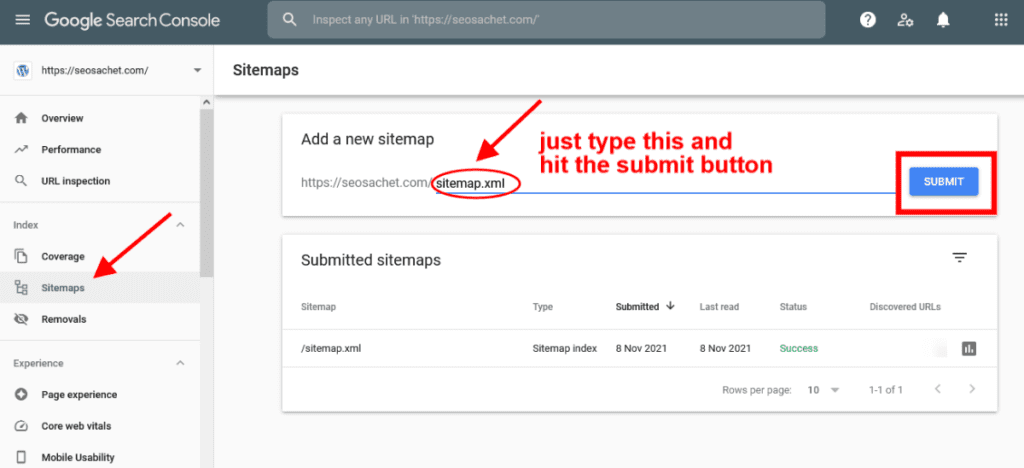
You don’t need to worry about it, as RankMath SEO automatically creates XML sitemaps. You just need to update it using Google Search Console whenever you publish a new post or update an existing one.
Step #7.
Search Engine Optimization
Your blog is ready to compete on Google SERPs. It’s time to give it a boost by integrating it with Search Console and Google Analytics.
Follow the steps given below to connect your blog with Google tools.
#7. Connect Your Blog to Google Analytics and Search Console
Now you’re ready with everything on your blog and have done all the settings and customization.
The next step is connecting your blog to Google Analytics to get insights into how many people visit your blog and what are the top-visited pages.
Note: It is a free service offered by Google to webmasters.
How to connect your blog to Google Analytics?
As soon as your blog goes live, this should be your primary task to connect Google Analytics and your blog.
Because this is how you come to know about real-time visitors on your blog and which pages are performing well on Google.
Here is a step-by-step tutorial to connect your blog to Google Analytics-
- Go to Google Analytics and sign up using your email address and add details like your name and website name.
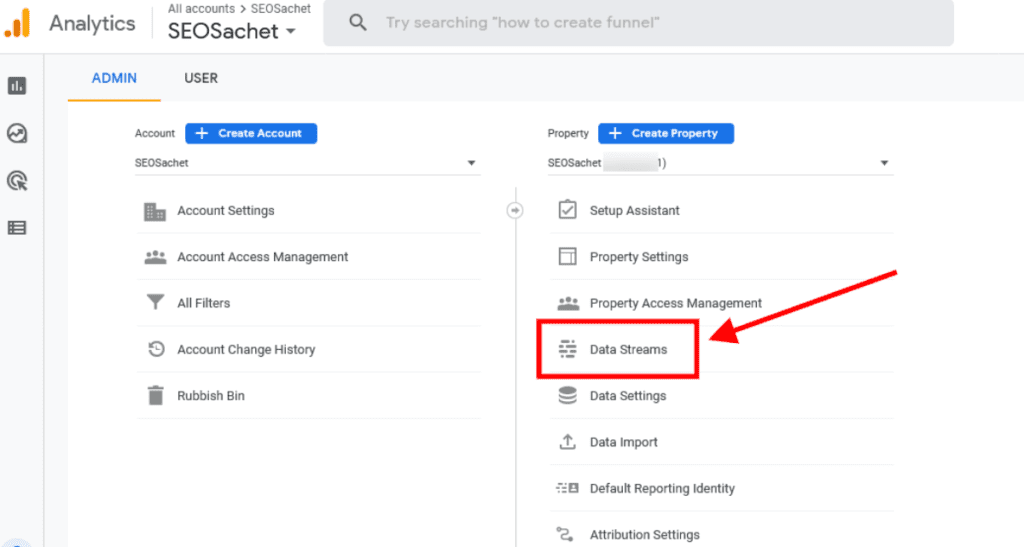
- Now in the Google Analytics dashboard, click on “Admin” shown in the bottom left corner
- On the next, you’ll see the following screen. You need to click on Data Streams to get your Google Analytics Tracking code.
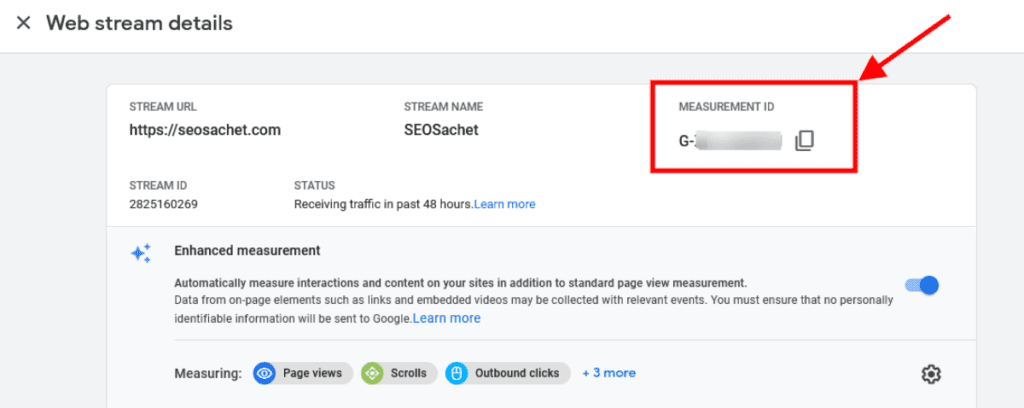
- Now, on the next page, select your data stream and continue.
- Earlier, it was a tracking code, but now in Google Analytics 4; it is called a Measurement ID. You can see the Measurement ID below.
- Just scroll down and you’ll see the Tagging Instructions. Here you’ll find an option to add a new on-page tag, click it.
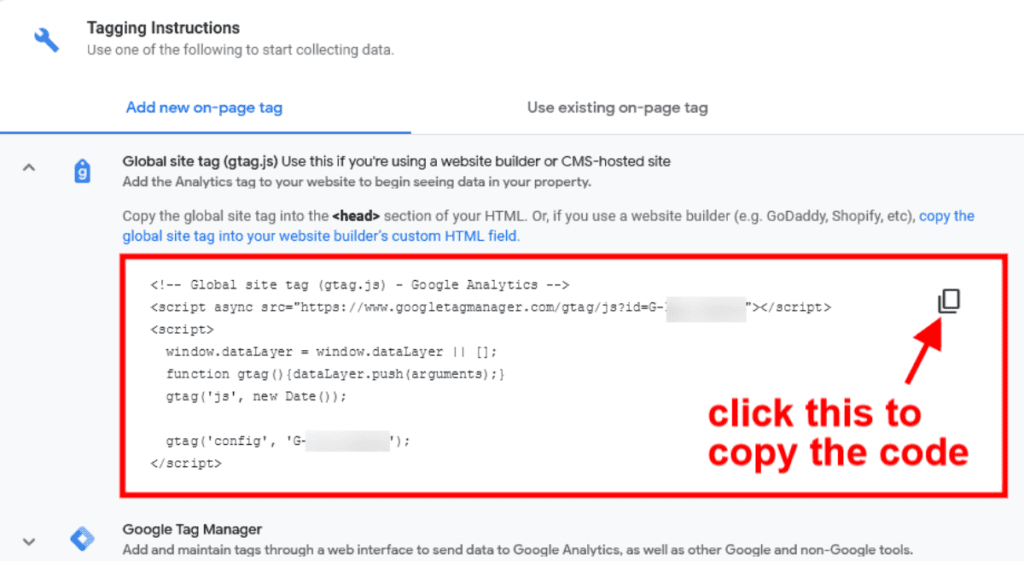
- This is what you’re looking for. Select this code and paste it into the <Head> section of your website.
If you’re using the GeneratePress Premium theme, it makes it easier to install the code. Just create a Hook and the code.
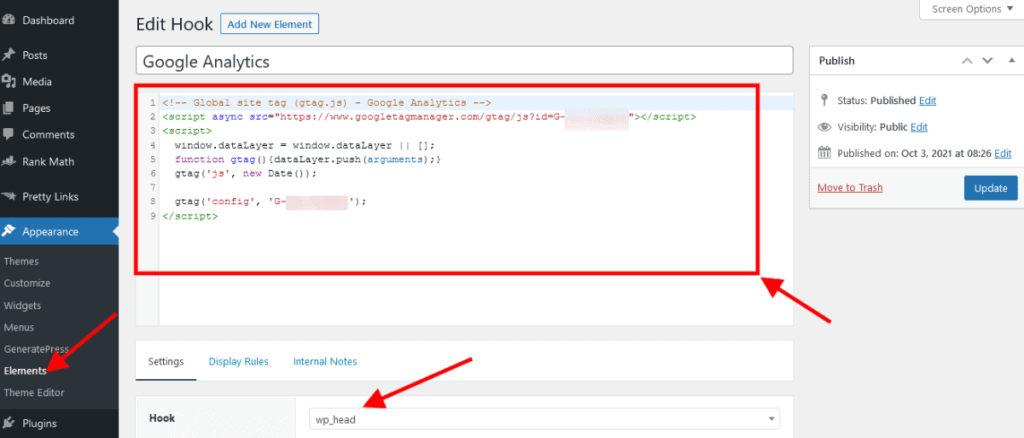
- After pasting the code, just select WP_Head in the hook to paste the code into the <Head> section and publish it.
That’s it.
Congrats! You’ve installed Google Analytics Measurement ID on your blog. Now, enjoy watching real-time visitors on your blog.
How to verify your blog in Google Search Console?
Now, it’s time to connect your blog to Google Search Console and verify it.
When you connect your blog to Google Analytics, it becomes very easy to verify it on Google Search Console.
- Just go to Google Search Console, sign up using your email ID, and add the property.
- Use the URL prefix method for easy verification and type your blog URL there.
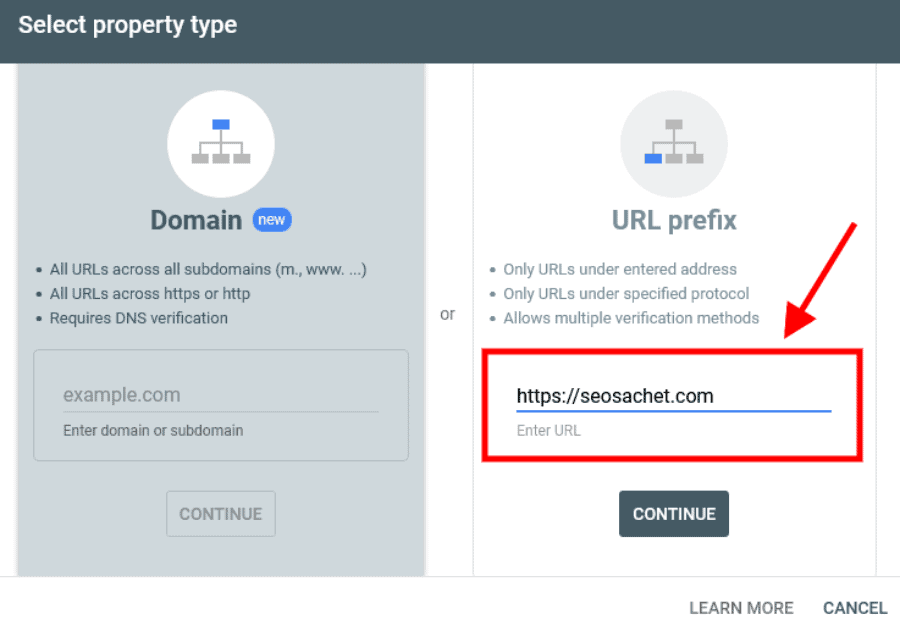
- Now, on the next page, you’ll have to verify this property.
- Simply, choose Google Analytics as an option to verify your property. As you have already connected your blog to Google Analytics, it is now quite easy to verify your property using Google Analytics.
That’s it! Your blog is now verified on Google Search Console.
Now you can easily submit sitemaps and use the URL inspection tool to index your blog posts.
Step #8.
Content Marketing
You’re now much closer to earning money with blogging.
Now, after optimization, it’s time for content marketing; to publish your content and promote it.

#8. Publish Content and Promote
Now you’ve set up your blog and I hope all your doubts about how to blog in India have been cleared.
Now you are ready for publishing and promoting content.
But writing content on your blog is not such a simple task and you should not take it for granted. A couple of years ago was a time when you write anything and just rank for keywords easily.
Now there is a lot of competition in every niche, so high-quality content is a necessity to increase visibility and traffic on your blog. And it is not so easy to just ponder over it for some time and just write it down.
High-quality content needs expertise and an understanding of the user intent.
Research a particular topic and understand the user’s mind behind every search query to rank for those keywords.
Above all, you should have a good writing style. Well, achieving a good readability score by writing error-free articles is easy if you have got Grammarly Premium.
Yes, Grammarly is the best tool to improve your writing style and produce error-free content. You may refer to this article to get a Grammarly Discount.
Another tool that you need for writing great content is a keyword research tool. This is a tool that will help you find all related keywords to a particular search query.
I’d recommend Semrush to get unlimited keyword ideas. You may grab the Semrush 7-day free trial to test out the tool and decide if it suits your needs or not.
Why a keyword research tool is necessary?
This might be your question, so I want to answer it as well.
Basically, you can get a topic for your article and write it as well. But, just think for a while. Do you know what keywords they search on Google and how difficult is to target those keywords?
Can you target each keyword and write the surrounding content?
If you think so, then you’re wrong, my friend, and just like other amateur bloggers, you’ll also end your blogging journey soon. The reason being you’ll not see any improvement in your blog. That’s the main reason many people start blogging and move on quickly.
You should include a keyword research tool in your initial investment in blogging. If you find Semrush costly, you may consider SE Ranking, as it is cheaper than Semrush and you get a 40% extra discount too.
Though SE Ranking is cheaper than Semrush, it doesn’t mean it compromises its quality. It is the fastest-growing all-in-one SEO software that is widely used by experts.
Before starting to write content, always do keyword research. For example, you want to write about the best running shoes.
You may use Semrush to get keyword ideas like:

Not only do you get insights into a particular keyword, in fact, but you also get a variety of related keywords and details about each.
So, it is quite easy for you to target a keyword and use LSI keywords to rank for all related keywords.
Note: While writing, your focus should be on the audience. When you fulfill user intent and use keywords, you got after keyword research. No one can stop you from getting a higher ranking on Google.
Many bloggers made this mistake as they focus on search engines to get quick ranking and do keyword stuffing. But you must avoid it. When your content is loved by the audience, you get a good ranking over time, as Google also loves content that fulfills user intent.
👉 Quick Tip
You should maintain consistency in writing blog posts to get indexed fast. If you write regularly, it shows Google that the blog’s content is fresh and provides value to the audience.
How to write SEO-optimized content for your blog?
Here you can see some crucial points to creating SEO-friendly content-
How to promote your content?
Everyone has a different promotion strategy, but these tips may help you in getting quick referral traffic-
So these are some effective ways to get referral traffic along with organic traffic.
How Do You Start a Blog in India? (Quick Recap)
To start a blog in India in 2023, follow these steps:
- Choose your niche: Decide on the topic or theme of your blog. Find something you are passionate about and have knowledge in.
- Select a blogging platform: There are several popular platforms like WordPress, Blogger, and Wix. Choose one that suits your needs.
- Register a domain name: Choose a unique and catchy domain name for your blog. Make sure it reflects your niche.
- Get web hosting: Find a reliable hosting provider to host your blog.
FAQs: How to Start a Blog in 2023
Final Thoughts: How to Start a Blog in India
I hope this detailed guide has cleared your all doubts regarding how to start blogging in India. I put every single effort into making this guide easy for you to start a blog.
In starting a blog in India, you just need to keep in mind to stay away from Black Hat SEO. This might give you a quick result but eventually, you have to face a penalty from Google.
Google rolls out its search algorithm updates a couple of times every year to make itself spam-free. So, always follow Google guidelines while blogging to keep your blog free from Google penalties.
I think now you will not ask this question to anyone “How to start a Blog in India“, but you may face many obstacles in your blogging journey.
Always remember that Blogging is not an overnight success game, it takes time to create a successful blog. Once you make your blog sustainable in your niche, you can live your dream life.
Now you have got to know everything about starting a blog in India. It’s your turn to take some action and build a brand.
All the Best for your Blogging Journey!
I hope you have got all your answers related to How to Start a Blog in India and Make Money.
This step-by-step guide should answer everything related to starting blogging in India. If you still face any issues while starting a blog, then don’t hesitate and write your queries in the comment section.
👉 If you like this guide, then please share it!


Very well explained, Nitin. Keep it up.
Thanks for the feedback, Abhishek. I’m glad you liked it.
Nitin, I liked the guide a lot and as you requested, I am happy to share the post on my social media profiles. The infographic you created for the post looks awesome, especially the colour combination you tried looks catchy. Keep creating such good infographics.
Thanks for the feedback, Harpreet. I’m glad that you liked the post. Happy Blogging!
Nowadays blogging has become so popular field that every next person want to enter in it, but the harsh truth is that not all become successful, the only key is the right approach and making a base very strong and this article covers the proper guidance that is required to build a successful blog from scratch in India, well-written article, Awesome work Nitin, keep it up!
Thank you, Jiten. Such feedback keeps me motivated.
Hey Nitin, just wanted to say article is very informative and easy to read. Also UI of your website looks good. Well Done, Keep It Up!